如何实现路由懒加载
{ path: '/login', component: () => import('@/views/login/index'), hidden: true },路由懒加载中的魔法注释
通过在注释中指定webpackChunkName,可以自定义这个文件的名字。
components = () => import(/* webpackChunkName:"login"*/ "../component/Login.vue")windows环境搭建Vue开发环境
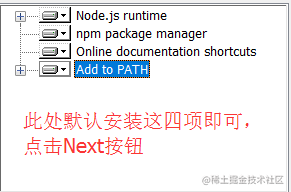
设置nodejs prefix(全局)和cache(缓存)路径
在nodejs安装路径下,新建node_global和node_cache两个文件夹
- 设置缓存文件夹
npm config set cache "D:\vueProject\nodejs\node_cache"- 设置全局模块存放路径
npm config set prefix "D:\vueProject\nodejs\node_global"基于 Node.js 安装cnpm(淘宝镜像)
npm install -g cnpm --registry=https://registry.npm.taobao.org设置环境变量可以使得住任意目录下都可以使用cnpm、vue等命令,而不需要输入全路径
// 系统环境变量
...\nodejs\node_global
// 用户变量
... \nodejs\node_modules
安装Vue
cnpm install vue -gvue-cli 脚手架
cnpm install vue-cli -g根据模版创建新项目
vue init webpack-simple mytest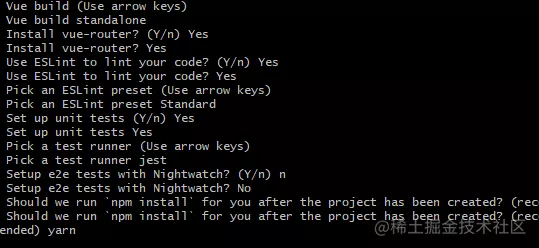
- build,最终发布代码的存放的位置
- config,配置目录,包括端口号
- node_modules,这是执行npm install后产生的,里面包含了Node.js和npm依赖的文件以及后续安装的第三方组件或第三方功能
- src,存放开发页面相关的文件
- assets,放置一些图片
- components,存放了组件文件
- App.vue,是项目入口文件
- main.js,项目的核心文件
- router,项目的路由
- static,一般用于存放静态资源,如图片,字体等
- .babelrc文件,用来设置转码的规则和插件的,一般情况不需要设置
测试一下该项目是否能够正常工作
cnpm run devProp的双向绑定
在父子组件通讯的时候,子组件都禁止直接修改父级传过来的prop,父组件总需要在子组件身上监听一个事件,然后由子组件去触发它,好让父组件来接收到payload去改变state。
自定义组件上的v-model指令以及.sync修饰符可以解决子组件修改父组件state
一个组件上的 v-model 默认会利用名为
value的 prop 和名为input的事件
双向绑定的效果:
<template>
  <child-component :val="val" />
</template>
<script>
export default {
  data() {
    return {
      val: 100
    }
  }
}
</script>
<template>
<div>
<div>{{val}}</div>
<button @click="handleClick">click</button>
</div>
</template>通过v-model
父组件通过v-model传递val值:
<template>
  <child-component v-model="val" />
</template>而子组件内通过model选项去绑定这个prop:
export default {
  model: {
    prop: 'anyKey',  // 不一定非要是value
    event: 'anyEventName'  // 不一定非要是input
  },
  props: {
    anyKey: {
      type: Number
    }
  },
  methods: {
    handleClick() {
      this.$emit('anyEventName', this.anyKey+2)
    }
  }
}
通过.sync修饰符
父组件通过.sync修饰符传递val值:
<template>
  <child-component :val.sync="val" />
</template>子组件,vue内部帮我们绑定了update:myPropName这样一个事件
export default {
  props: {
    val: {
      type: Number
    }
  },
  methods: {
    handleClick() {
      this.$emit('update:val', this.val+2)
    }
  }
}
v-bind.sync=”{ title: doc.title }”这种绑定字面量对象,修饰符是无法正常工作的
PropSync的用法
import { Vue, Component, PropSync } from 'vue-property-decorator'

@Component
export default class YourComponent extends Vue {
  @PropSync('name', { type: String }) syncedName!: string
}
以上代码等同于:
export default {
  props: {
    name: {
      type: String,
    },
  },
  computed: {
    syncedName: {
      get() {
        return this.name
      },
      set(value) {
        this.$emit('update:name', value)
      },
    },
  },
}
// 父组件
<template>
<div class="PropSync">
<h1>父组件</h1>
<h2>{{name}}</h2>
<Child :name.sync="name"></Child>
</div>
</template>
<script lang='ts'>
import { Vue, Component } from 'vue-property-decorator';
import Child from './Child.vue';
@Component({components: { Parent }})
export default class ParentPage extends Vue {
private name = '父组件名字';
}
</script>
// 子组件
<template>
<div class="child">
<h1>子组件:</h1>
<h2>syncedName:{{ syncedName }}</h2>
<button @click="changeName">修改name</button>
</div>
</template>
<script lang="ts">
import { Component, Vue, PropSync} from 'vue-property-decorator';
@Component
export default class ChildComponent extends Vue {
@PropSync('name', { type: String }) syncedName!: string; // 用来实现组件的双向绑定,子组件可以更改父组件穿过来的值
changeName(): void {
this.syncedName = '子组件修改过后的syncedName!'; // 双向绑定,更改syncedName会更改父组件的name
}
}
</script>@Model的作用
@Model(event?: string, options: (PropOptions | Constructor[] | Constructor) = {})

@Model装饰器允许我们在一个组件上自定义v-model,接受两个参数:

event: string类型,表示事件名;
options: PropOptions | Constructor[] | Constructor与@Prop的第一个参数一致;
@Component
export default class YourComponent extends Vue {
@Model('change', { type: Boolean }) readonly checked!: boolean
}等同于以下代码:
export default {
  model: {
    prop: 'checked',
    event: 'change',
  },
  props: {
    checked: {
      type: Boolean,
    },
  },
}
ModelSync的用法
@ModelSync(propName: string, event?: string, options: (PropOptions | Constructor[] | Constructor) = {})
@ModelSync装饰器可接受三个参数:

propName: string类型,表示类型名称;
event: string类型,表示事件名;
options: PropOptions | Constructor[] | Constructor与@Prop的第一个参数一致;
看下面例子:
import { Vue, Component, ModelSync } from 'vue-property-decorator'

@Component
export default class YourComponent extends Vue {
  @ModelSync('checked', 'change', { type: Boolean })
  readonly checkedValue!: boolean
}
以上代码等同于:
export default {
  model: {
    prop: 'checked',
    event: 'change',
  },
  props: {
    checked: {
      type: Boolean,
    },
  },
  computed: {
    checkedValue: {
      get() {
        return this.checked
      },
      set(value) {
        this.$emit('change', value)
      },
    },
  },
}
@Provide
import { Component, Inject, Provide, Vue } from 'vue-property-decorator'

const symbol = Symbol('baz')

@Component
export class MyComponent extends Vue {
  @Inject() readonly foo!: string
  @Inject('bar') readonly bar!: string
  @Inject({ from: 'optional', default: 'default' }) readonly optional!: string
  @Inject(symbol) readonly baz!: string

  @Provide() foo = 'foo'
  @Provide('bar') baz = 'bar'
}
等同于:
const symbol = Symbol('baz')

export const MyComponent = Vue.extend({
  inject: {
    foo: 'foo',
    bar: 'bar',
    optional: { from: 'optional', default: 'default' },
    baz: symbol,
  },
  data() {
    return {
      foo: 'foo',
      baz: 'bar',
    }
  },
  provide() {
    return {
      foo: this.foo,
      bar: this.baz,
    }
  },
})
@ProvideReactive和@InjectReactive
这些装饰器是@Provide和@Inject的响应式版本。如果父组件修改了提供的值,则子组件可以捕获此修改。
const key = Symbol()
@Component
class ParentComponent extends Vue {
  @ProvideReactive() one = 'value'
  @ProvideReactive(key) two = 'value'
}

@Component
class ChildComponent extends Vue {
  @InjectReactive() one!: string
  @InjectReactive(key) two!: string
}
@Emit(event?: string) decorator
import { Vue, Component, Emit } from 'vue-property-decorator'

@Component
export default class YourComponent extends Vue {
  count = 0

  @Emit()
  addToCount(n: number) {
    this.count += n
  }

  @Emit('reset')
  resetCount() {
    this.count = 0
  }

  @Emit()
  returnValue() {
    return 10
  }

  @Emit()
  onInputChange(e) {
    return e.target.value
  }

  @Emit()
  promise() {
    return new Promise((resolve) => {
      setTimeout(() => {
        resolve(20)
      }, 0)
    })
  }
}
等同于
export default {
  data() {
    return {
      count: 0,
    }
  },
  methods: {
    addToCount(n) {
      this.count += n
      this.$emit('add-to-count', n)
    },
    resetCount() {
      this.count = 0
      this.$emit('reset')
    },
    returnValue() {
      this.$emit('return-value', 10)
    },
    onInputChange(e) {
      this.$emit('on-input-change', e.target.value, e)
    },
    promise() {
      const promise = new Promise((resolve) => {
        setTimeout(() => {
          resolve(20)
        }, 0)
      })

      promise.then((value) => {
        this.$emit('promise', value)
      })
    },
  },
}
@Ref(refKey?: string) decorator
import { Vue, Component, Ref } from 'vue-property-decorator'

import AnotherComponent from '@/path/to/another-component.vue'

@Component
export default class YourComponent extends Vue {
  @Ref() readonly anotherComponent!: AnotherComponent
  @Ref('aButton') readonly button!: HTMLButtonElement
}
等同于:
export default {
  computed() {
    anotherComponent: {
      cache: false,
      get() {
        return this.$refs.anotherComponent as AnotherComponent
      }
    },
    button: {
      cache: false,
      get() {
        return this.$refs.aButton as HTMLButtonElement
      }
    }
  }
}
@VModel(propsArgs?: PropOptions) decorator
import { Vue, Component, VModel } from 'vue-property-decorator'

@Component
export default class YourComponent extends Vue {
  @VModel({ type: String }) name!: string
}
等同于:
export default {
  props: {
    value: {
      type: String,
    },
  },
  computed: {
    name: {
      get() {
        return this.value
      },
      set(value) {
        this.$emit('input', value)
      },
    },
  },
}
排除打包
vue.config.js, 添加 externals 项
configureWebpack: {
    externals: {
      'vue': 'Vue',
      'element-ui': 'ElementUI',
      'xlsx': 'XLSX'
    },
    resolve: {
      alias: {
        '@': resolve('src')
      }
    },
}
引用网络资源
- 引用CDN:
- 减少应用打包出来的包体积
- 加快静态资源的访问
- 利用浏览器缓存,不会变动的文件长期缓存
vue-cli3.0 开发环境构建
vue-cli安装
(1)若已全局安装vue-cli (1.x 或 2.x),需先卸载
npm uninstall vue-cli -g(2)全局安装 vue-cli3.0
npm install -g @vue/cli(3)创建项目
vue create 项目名>(*) Babel
( ) TypeScript
( ) Progressive Web App (PWA) Support //支持渐进式网页应用程序
( ) Router //路由管理器
( ) Vuex //状态管理模式(构建一个中大型单页应用时)
( ) CSS Pre-processors //css预处理
(*) Linter / Formatter //代码风格、格式校验
( ) Unit Testing // 单元测试
( ) E2E Testing // 即端对端测试启动项目
// 1、进入项目
cd 项目名

 // 2、运行
npm run serve
单页面

前端路由模式hash
“#”代表网页中的一个位置,右面的字符就是代表的位置信息。
“#”意味着它不管怎么变化都不会影响请求URL,即它只针对浏览器的。
在第一个#后面出现的任何字符,都会被浏览器解读为位置标识符。这意味着,这些字符都不会被发送到服务器端。如果需要发送需要先转码。
“#”意味着单单改变#后的部分,浏览器只会滚动到相应位置,不会重新加载网页。
改变#会改变浏览器的访问历史
window.location.hash这个属性可读可写。读取时,可以用来判断网页状态是否改变;写入时,则会在不重载网页的前提下,创造一条访问历史记录。
路由模式history
(1)History.length (只读)
返回一个整数,该整数表示会话历史中元素的数目,包括当前加载的页。
(2)History.state (只读)
返回一个表示历史堆栈顶部的状态的值
(3)History.scrollRestoration
允许Web应用程序在历史导航上显式地设置默认滚动恢复行为。
vue element input 限制输入数字后几位小数点
onkeyup="if(isNaN(value)) {value = null } if(value.indexOf('.')>0) { value = value.slice(0, value.indexOf('.')+5) }"vue实现audio进度拖拽播放及拖拽播放问题解决
经初步分析,出现这种问题的原因是audio的timeupdate方法约每秒触发一次,js代码在播放音频时没有进行处理,此方法一直在修改slider的model值,当把滑块拖到目标位置(过程超过1s)松开时,slider拖动的实际值已经被timeupdate修改成了currentTime,所以松手后滑块会立刻回到currentTime值的位置。
只要在拖动滑块不松开的过程中timeupdate方法不修改slider的model值就行了,即增加一个flag,给滑块加上鼠标事件mousedown、mouseup,鼠标按下(意味着在拖动)flag为true,鼠标松开(拖动结束)flag为false,timeupdate事件只在flag为false时才对slider的model值进行修改就行了。
<div @mousedown="audio.isDraging = true" @mouseup="audio.isDraging = false">
<el-slider
  v-model="sliderTime"
  :show-tooltip="false"
  class="audio-content-slider"
  @change="changeCurrentTime"
/>
</div>
private audio: any = {
// 音频当前播放时长
currentTime: 0,
// 音频最大播放时长
maxTime: 0,
// 该字段是音频是否处于播放状态的属性
playing: false,
// 是否静音
muted: false,
speed: 1,
waiting: true,
preload: 'auto',
isDraging: false
}
timeupdateFunc(e){
    if(!this.isDraging){
        this.playProcess = (e.target.currentTime)/this.totalTimes*100;
        this.currentTime = e.target.currentTime;
    }
},
git fetch vs git pull
都是从远程拉取代码到本地,git fetch只是拉取到本地,git pull不仅拉取到本地还merge到本地分支中。所以git pull是git fetch与git merge的集合体。
npm config list
$ npm config list
; "builtin" config from c:\vue\node_global\node_modules\npm\npmrc

; prefix = "C:\\Users\\da\\AppData\\Roaming\\npm" ; overridden by user

; "user" config from C:\Users\da\.npmrc

ca = [""]
cache = "C:\\vue\\node_cache"
get = "registry"
prefix = "c:\\vue\\node_global"
registry = "https://registry.npmjs.org/"
strict-ssl = true

; node bin location = C:\vue\node.exe
; cwd = C:\HBuilderProjects
; HOME = C:\Users\da
; Run `npm config ls -l` to show all defaults.
npm config set registry https://registry.npmjs.org
npm config set registry https://registry.npm.taobao.org
原因是https的自签名失败
临时解决办法:关闭ssl
npm config set strict-ssl false$ npm get registry
https://registry.npmjs.org/$ npm uninstall -g vue-cli
npm ERR! code EPERM
npm ERR! syscall mkdir
npm ERR! path c:\vue\node_global\node_modules\.vue-cli-SVGezKmI
npm ERR! errno -4048
npm ERR! Error: EPERM: operation not permitted, mkdir 'c:\vue\node_global\node_modules\.vue-cli-SVGezKmI'
npm ERR! [Error: EPERM: operation not permitted, mkdir 'c:\vue\node_global\node_modules\.vue-cli-SVGezKmI'] {
npm ERR! errno: -4048,
npm ERR! code: 'EPERM',
npm ERR! syscall: 'mkdir',
npm ERR! path: 'c:\\vue\\node_global\\node_modules\\.vue-cli-SVGezKmI'
npm ERR! }
npm ERR!
npm ERR! The operation was rejected by your operating system.
npm ERR! It's possible that the file was already in use (by a text editor or antivirus),
npm ERR! or that you lack permissions to access it.
npm ERR!
npm ERR! If you believe this might be a permissions issue, please double-check the
npm ERR! permissions of the file and its containing directories, or try running
npm ERR! the command again as root/Administrator.

$ node -v
v14.17.3

$ vue -V
2.9.6

$ npm -v
7.20.1

$ vue -V
@vue/cli 4.5.13
vue 创建项目有必要安装Progressive Web App(PWA)Support吗
简单说一下:
一是给项目添加一些webapp支持,比如在手机端支持发送到桌面图标,根据不同平台和浏览器尝试去掉浏览器自带的地址栏、底栏实现全屏体验,这个主要是视觉上和体验上的,没有什么实际功能。
实现方式就是勾选pwa支持后项目会生成manifest.json,在里面配置即可
二是增加可离线支持。其实可离线也不一定非要用pwa,有不少其他手段。可离线就是比如你的项目不是一定要全程联网才能实现功能,只要用户访问过一次你的网站,下一次进入时哪怕没有网络,你的项目也不会白屏,而是照常运行或者开放部分功能,或者给个断网提示等等。对于那些功能性网站挺有用的,举例来说什么在线计算器,在线算税小工具等。
通过配置项目生成的registerServiceWorker.js来注册serviceworker实现,具体操作还是很复杂的,详情百度.
PWA 的主要特点包括下面三点:
- 可靠 – 即使在不稳定的网络环境下,也能瞬间加载并展现
- 体验 – 快速响应,并且有平滑的动画响应用户的操作
- 粘性 – 像设备上的原生应用,具有沉浸式的用户体验,用户可以添加到桌面
PWA 具有下面一些特性:
- 渐进式 – 适用于所有浏览器,因为它是以渐进式增强作为宗旨开发的
- 连接无关性 – 能够借助 Service Worker 在离线或者网络较差的情况下正常访问
- 类似应用 – 由于是在 App Shell 模型基础上开发,因为应具有 Native App 的交互和导航,给用户 Native App 的体验
- 持续更新 – 始终是最新的,无版本和更新问题
- 安全 – 通过 HTTPS 协议提供服务,防止窥探和确保内容不被篡改
- 可索引 – 应用清单文件和 Service Worker 可以让搜索引擎索引到,从而将其识别为『应用』
- 粘性 – 通过推送离线通知等,可以让用户回流
- 可安装 – 用户可以添加常用的 webapp 到桌面,免去去应用商店下载的麻烦
- 可链接 – 通过链接即可分享内容,无需下载安装
manifest 的目的是将Web应用程序安装到设备的主屏幕,为用户提供更快的访问和更丰富的体验。
为了这样做,我们需要添加一个manifest.json文件并且在index.html文件中进行声明
pwa-manifest-webpack-plugin能够让我们在应用构建的时候生成文件:
npm i pwa-manifest-webpack-plugin --save我们接着能够通过编辑build/webpack.dev.conf.js 以及build/webpack.prod.conf.js来更新构建过程。
在顶部引入pwa-manifest-webpack-plugin :
const manifestPlugin = require('pwa-manifest-webpack-plugin')将它添加到插件:
plugins: [
    new manifestPlugin({
      name: '程序员', // 标题 指定了Web App的名称。
      short_name: '程序员', // 短标题 short_name其实是该应用的一个简称。一般来说,当没有足够空间展示应用的name时,系统就会使用short_name。
      description: '程序员', // 这个字段的含义非常简单,就是一段对该应用的描述。
      display: 'standalone', // fullscreen:全屏显示,会尽可能将所有的显示区域都占满;standalone:独立应用模式,这种模式下打开的应用有自己的启动图标,并且不会有浏览器的地址栏。因此看起来更像一个Native App;minimal-ui:与standalone相比,该模式会多出地址栏;browser:一般来说,会和正常使用浏览器打开样式一致。
      start_url: '/', // 这个属性指定了用户打开该Web App时加载的URL。相对URL会相对于manifest。这里我们指定了start_url为/,访问根目录。
      orientation: 'portrait-primary', // 控制Web App的方向。设置某些值会具有类似锁屏的效果(禁止旋转),例如例子中的portrait-primary。具体的值包括:any, natural, landscape, landscape-primary, landscape-secondary, portrait, portrait-primary, portrait-secondary。
      icon: {
        // icons本身是一个数组,每个元素包含三个属性:
        //
        // sizes:图标的大小。通过指定大小,系统会选取最合适的图标展示在相应位置上。
        // src:图标的文件路径。注意相对路径是相对于manifest。
        // type:图标的图片类型
        src: path.resolve('src/assets/logo.png'),
        sizes: [200]
      },
      background_color: '#2d8cf0', // background_color是在应用的样式资源为加载完毕前的默认背景,因此会展示在开屏界面。background_color加上我们刚才定义的icons就组成了Web App打开时的“开屏图”。
      theme_color: '#2d8cf0' // 定义应用程序的默认主题颜色。 这有时会影响操作系统显示应用程序的方式(例如,在Android的任务切换器上,主题颜色包围应用程序)。此外,还可以在meta标签中设置theme_color:<meta name="theme-color" content="#5eace0"/>
    })
]
最后,在 index.html中声明使用manifest.json:
在 index.html中声明使用manifest.json:
<link rel="manifest" href="./manifest.json">

<!-- 针对safari(iOS)的添加到桌面功能进行相关设置 -->
    <meta name="apple-mobile-web-app-capable" content="yes">
    <meta name="apple-mobile-web-app-status-bar-style" content="default">
    <meta name="apple-mobile-web-app-title" content="程序员">
    <link rel="apple-touch-icon" href="./static/images/logo.png">
<!--end-->

<!-- IE的设置 -->
    <meta name="application-name" content="程序员" />
    <meta name="msapplication-TileColor" content="#222">
    <meta name="msapplication-square70x70logo" content="./static/images/logo.png" />
    <meta name="msapplication-square150x150logo" content="./static/images/logo.png" />
    <meta name="msapplication-square310x310logo" content="./static/images/logo.png" />
<!--end-->
配置完上面的步骤之后,你可能需要重启一下 npm run dev
service worker 是一个 WEB API,是 Web Workers 的一种实现,功能是可以拦截、处理请求,配合 CacheStorage 等 api,可以做到将资源存储到本地等,实现离线访问。
service workers 的生命周期有:
- 安装 install
- 激活 activate
新建文件service-worker.js
如何把vue项目改造成支持PWA的功能(第二章:加入service-worker)
Mixins(混入)
Mixins 有点像是函数或者是宏,当某段 CSS 经常需要在多个元素中使用时,可以为这些共用的 CSS 定义一个 Mixin,然后只需要在需要引用这些 CSS 地方调用该 Mixin 即可。
sass中可用mixin定义一些代码片段,且可传参数,方便日后根据需求调用。比如说处理css3浏览器前缀:
@mixin error($borderWidth: 2px) {
  border: $borderWidth solid #F00;
  color: #F00;
}
.generic-error {
  padding: 20px;
  margin: 4px;
  @ include error(); //这里调用默认 border: 2px solid #F00;
}
.login-error {
  left: 12px;
  position: absolute;
  top: 20px;
  @ include error(5px); //这里调用 border:5px solid #F00;
}
在sass中,还支持条件语句:
@if可一个条件单独使用,也可以和@else结合多条件使用代码如下:
$lte7: true;
$type: monster;
.ib{
    display:inline-block;
    @if $lte7 {
        *display:inline;
        *zoom:1;
    }
}
p {
  @if $type == ocean {
    color: blue;
  } @else if $type == matador {
    color: red;
  } @else if $type == monster {
    color: green;
  } @else {
    color: black;
  }
}
区别
- node-sass 是用 node(调用 cpp 编写的 libsass)来编译 sass;dart-sass 是用 drat VM 来编译 sass;
- node-sass是自动编译实时的,dart-sass需要保存后才会生效 推荐 dart-sass 性能更好(也是 sass 官方使用的),而且 node-sass 因为国情问题经常装不上
ESLint with error prevention only
- 只配置使用 ESLint 官网的推荐规则
- 这些规则在这里添加链接描述 ESLint + Airbnb config
- 使用 ESLint 官网推荐的规则 + Airbnb 第三方的配置
- Airbnb 的规则在这里添加链接描述 ESLint + Standard config
- 使用 ESLint 官网推荐的规则 + Standard 第三方的配置
- Standard 的规则在这里 添加链接描述 ESLint + Prettier
- 使用 ESLint 官网推荐的规则 + Prettier 第三方的配置
- Prettier 主要是做风格统一。代码格式化工具
? Pick a unit testing solution: (Use arrow keys)
> Mocha + Chai //mocha灵活,只提供简单的测试结构,如果需要其他功能需要添加其他库/插件完成。必须在全局环境中安装
Jest //安装配置简单,容易上手。内置Istanbul,可以查看到测试覆盖率,相较于Mocha:配置简洁、测试代码简洁、易于和babel集成、内置丰富的expect
$ yarn config get registry
https://registry.yarnpkg.com

$ npm config get registry
https://registry.npmjs.org/

$ yarn config get registry
https://registry.npm.taobao.org

$ cnpm config get registry
https://registry.nlark.com/
[click.left&contextmenu&click.middle]
<div id="ask"><!--vue不能控制body和html的标签-->
    <!--鼠标左键-->
    <div :style="left_style" @click.left="mouseclick('左')"></div>
    <!--鼠标中键-->
    <div :style="middle_style" @click.middle="mouseclick('中')"></div>
    <!--鼠标右键-->
    <!--加prevent为了屏蔽浏览器自带右键-->
    <div :style="right_style" @contextmenu.prevent="mouseclick('右')"></div>
</div>
安装:
npm install -g @vue/cli
# OR
yarn global add @vue/cli
创建一个项目:
vue create my-project
# OR
vue ui
vue-cil是vue的脚手架工具)
$ npm install -g vue-cli
新建一个自己的vue项目
$ vue init webpack vuedemo
Vue CLI 2
npm install -g @vue/cli-init
# `vue init` 的运行效果将会跟 `vue-cli@2.x` 相同
vue init webpack my-project

$ yarn config get registry
https://registry.npm.taobao.org

$ yarn config set registry https://registry.npmjs.org --global
yarn config v1.22.11
success Set "registry" to "https://registry.npmjs.org".
Done in 0.06s.

$ cnpm config get registry
https://registry.nlark.com/
@vue-cli3创建项目报错:ERROR command failed: npm install --loglevel error --registry=https://registry.npm.taobao.org --di

{
  "useTaobaoRegistry": false,
  "presets": {
    "jeskson": {
      "useConfigFiles": true,
      "plugins": {
        "@vue/cli-plugin-babel": {},
        "@vue/cli-plugin-typescript": {
          "classComponent": true,
          "useTsWithBabel": true
        },
        "@vue/cli-plugin-router": {
          "historyMode": true
        },
        "@vue/cli-plugin-vuex": {},
        "@vue/cli-plugin-eslint": {
          "config": "base",
          "lintOn": [
            "save"
          ]
        },
        "@vue/cli-plugin-unit-mocha": {},
        "@vue/cli-plugin-e2e-cypress": {}
      },
      "vueVersion": "2",
      "cssPreprocessor": "dart-sass"
    }
  },
  "packageManager": "yarn"
}
[Error: unable to get local issuer certificate while running yarn command]
yarn config set "strict-ssl" false -g

$ yarn config list
yarn config v1.22.11
info yarn config
{
  'version-tag-prefix': 'v',
  'version-git-tag': true,
  'version-commit-hooks': true,
  'version-git-sign': false,
  'version-git-message': 'v%s',
  'init-version': '1.0.0',
  'init-license': 'MIT',
  'save-prefix': '^',
  'bin-links': true,
  'ignore-scripts': false,
  'ignore-optional': false,
  registry: 'https://registry.npm.taobao.org',
  'strict-ssl': false,
  'user-agent': 'yarn/1.22.11 npm/? node/v14.17.3 win32 x64',
  lastUpdateCheck: 1632822666163
}
info npm config
{
  cache: 'C:\\vue\\node_cache',
  prefix: 'c:\\vue\\node_global',
  ca: [
    ''
  ],
  'strict-ssl': false,
  registry: 'https://registry.npm.taobao.org/',
  get: 'registry'
}
Done in 0.16s.
npm config set registry https://registry.npm.taobao.org
$ yarn config get registry
https://registry.npmjs.orgnpm i 选项–global,–save,–save-dev
-global: 简写 -g

    npm i express -g 为全局安装,这种就可以直接使用express命令, 否则会提示express不是内部或外部命令

-save: 简写 -S, 作用是在package.json的dependencies字段增加或修改安装包和版本号

-save-dev: 简写 -D, 是修改devDependencies, 这样就不用安装了某个包之后手动修改package.json
~ 与 ^ 版本
版本分为: 主版本号、次版本号、补丁版本号

"devDependencies": {
    "vue": "~2.2.2",            // 匹配最近小版本,如,会匹配所有的2.2.x版本,但最高不会匹配2.3.0
    "vue-router": "^2.2.0"        // 最近的一个大版本,所有 2.x.x但不不包括3.0.0,相当于 2.0.0 <= version < 3.0.0
}
详细介绍了npm的使用,以及参数相关配置
vue-cli-service serve 命令会启动一个开发服务器 (基于 [webpack-dev-server]) 并附带开箱即用的模块热重载 (Hot-Module-Replacement)。
使用 vue.config.js 里的 [devServer] 字段配置开发服务器。
vue-cli-service build 会在 dist/ 目录产生一个可用于生产环境的包,带有 JS/CSS/HTML 的压缩,和为更好的缓存而做的自动的 vendor chunk splitting。它的 chunk manifest 会内联在 HTML 里。
@vue/cli-plugin-eslint 会注入 vue-cli-service lint 命令
缓存和并行处理
cache-loader会默认为 Vue/Babel/TypeScript 编译开启。文件会缓存在node_modules/.cache中——如果你遇到了编译方面的问题,记得先删掉缓存目录之后再试试看。thread-loader会在多核 CPU 的机器上为 Babel/TypeScript 转译开启。
Git Hook
在安装之后,@vue/cli-service 也会安装 [yorkie],它会让你在 package.json 的 gitHooks 字段中方便地指定 Git hook:
{
  "gitHooks": {
    "pre-commit": "lint-staged"
  },
   "lint-staged": {
    "*.{js,vue}": [
      "vue-cli-service lint",
      "git add"
    ]
  }
}
浏览器兼容性
browserslist
你会发现有 package.json 文件里的 browserslist 字段 (或一个单独的 .browserslistrc 文件),指定了项目的目标浏览器的范围。这个值会被 [@babel/preset-env] 和 [Autoprefixer]用来确定需要转译的 JavaScript 特性和需要添加的 CSS 浏览器前缀。
Polyfill
useBuiltIns: ‘usage’
一个默认的 Vue CLI 项目会使用 [@vue/babel-preset-app],它通过 @babel/preset-env 和 browserslist 配置来决定项目需要的 polyfill。
默认情况下,它会把 [useBuiltIns: 'usage'] 传递给 @babel/preset-env,这样它会根据源代码中出现的语言特性自动检测需要的 polyfill。这确保了最终包里 polyfill 数量的最小化。然而,这也意味着如果其中一个依赖需要特殊的 polyfill,默认情况下 Babel 无法将其检测出来。
如果有依赖需要 polyfill,你有几种选择:
- 如果该依赖基于一个目标环境不支持的 ES 版本撰写: 将其添加到
vue.config.js中的 [transpileDependencies]选项。这会为该依赖同时开启语法转换和根据使用情况检测 polyfill。 - 如果该依赖交付了 ES5 代码并显式地列出了需要的 polyfill: 你可以使用
@vue/babel-preset-app的 [polyfills]选项预包含所需要的 polyfill。注意es.promise将被默认包含,因为现在的库依赖 Promise 是非常普遍的。
// babel.config.js
module.exports = {
  presets: [
    ['@vue/app', {
      polyfills: [
        'es.promise',
        'es.symbol'
      ]
    }]
  ]
}- 如果该依赖交付 ES5 代码,但使用了 ES6+ 特性且没有显式地列出需要的 polyfill (例如 Vuetify):请使用
useBuiltIns: 'entry'然后在入口文件添加import 'core-js/stable'; import 'regenerator-runtime/runtime';。这会根据browserslist目标导入所有 polyfill,这样你就不用再担心依赖的 polyfill 问题了,但是因为包含了一些没有用到的 polyfill 所以最终的包大小可能会增加。
构建库或是 Web Component 时的 Polyfills
当使用 Vue CLI 来[构建一个库或是 Web Component]时,推荐给 @vue/babel-preset-app 传入 useBuiltIns: false 选项。这能够确保你的库或是组件不包含不必要的 polyfills。通常来说,打包 polyfills 应当是最终使用你的库的应用的责任。
现代模式
有了 Babel 我们可以兼顾所有最新的 ES2015+ 语言特性,但也意味着我们需要交付转译和 polyfill 后的包以支持旧浏览器。这些转译后的包通常都比原生的 ES2015+ 代码会更冗长,运行更慢。现如今绝大多数现代浏览器都已经支持了原生的 ES2015,所以因为要支持更老的浏览器而为它们交付笨重的代码是一种浪费。
Vue CLI 提供了一个“现代模式”帮你解决这个问题。以如下命令为生产环境构建:
vue-cli-service build --modernVue CLI 会产生两个应用的版本:一个现代版的包,面向支持 [ES modules]的现代浏览器,另一个旧版的包,面向不支持的旧浏览器。
- 现代版的包会通过
<script type="module">在被支持的浏览器中加载;它们还会使用<link rel="modulepreload">进行预加载。 - 旧版的包会通过
<script nomodule>加载,并会被支持 ES modules 的浏览器忽略。 - 一个针对 Safari 10 中
<script nomodule>的修复会被自动注入。
对于一个 Hello World 应用来说,现代版的包已经小了 16%。在生产环境下,现代版的包通常都会表现出显著的解析速度和运算速度,从而改善应用的加载性能。
HTML
Index 文件
public/index.html 文件是一个会被 [html-webpack-plugin]处理的模板。在构建过程中,资源链接会被自动注入。另外,Vue CLI 也会自动注入 resource hint (preload/prefetch、manifest 和图标链接 (当用到 PWA 插件时) 以及构建过程中处理的 JavaScript 和 CSS 文件的资源链接。
插值
因为 index 文件被用作模板,所以你可以使用 [lodash template] 语法插入内容:
<%= VALUE %>用来做不转义插值;<%- VALUE %>用来做 HTML 转义插值;<% expression %>用来描述 JavaScript 流程控制。
除了[被 html-webpack-plugin 暴露的默认值]之外,所有[客户端环境变量]也可以直接使用。例如,BASE_URL 的用法:
<link rel="icon" href="<%= BASE_URL %>favicon.ico">Preload
[<link rel="preload">] 是一种 resource hint,用来指定页面加载后很快会被用到的资源,所以在页面加载的过程中,我们希望在浏览器开始主体渲染之前尽早 preload。
默认情况下,一个 Vue CLI 应用会为所有初始化渲染需要的文件自动生成 preload 提示。
这些提示会被 [@vue/preload-webpack-plugin]注入,并且可以通过 chainWebpack 的 config.plugin('preload') 进行修改和删除。
Prefetch
[<link rel="prefetch">]是一种 resource hint,用来告诉浏览器在页面加载完成后,利用空闲时间提前获取用户未来可能会访问的内容。
默认情况下,一个 Vue CLI 应用会为所有作为 async chunk 生成的 JavaScript 文件 ([通过动态 import() 按需 code splitting]的产物) 自动生成 prefetch 提示。
这些提示会被 [@vue/preload-webpack-plugin] 注入,并且可以通过 chainWebpack 的 config.plugin('prefetch') 进行修改和删除。
示例:
// vue.config.js
module.exports = {
  chainWebpack: config => {
    // 移除 prefetch 插件
    config.plugins.delete('prefetch')

    // 或者
    // 修改它的选项:
    config.plugin('prefetch').tap(options => {
      options[0].fileBlacklist = options[0].fileBlacklist || []
      options[0].fileBlacklist.push(/myasyncRoute(.)+?.js$/)
      return options
    })
  }
}
当 prefetch 插件被禁用时,你可以通过 webpack 的内联注释手动选定要提前获取的代码区块:
import(/* webpackPrefetch: true */ './someAsyncComponent.vue')webpack 的运行时会在父级区块被加载之后注入 prefetch 链接。
提示
Prefetch 链接将会消耗带宽。如果你的应用很大且有很多 async chunk,而用户主要使用的是对带宽较敏感的移动端,那么你可能需要关掉 prefetch 链接并手动选择要提前获取的代码区块。
不生成 index
当基于已有的后端使用 Vue CLI 时,你可能不需要生成 index.html,这样生成的资源可以用于一个服务端渲染的页面。这时可以向 [vue.config.js]加入下列代码:
// vue.config.js
module.exports = {
  // 去掉文件名中的 hash
  filenameHashing: false,
  // 删除 HTML 相关的 webpack 插件
  chainWebpack: config => {
    config.plugins.delete('html')
    config.plugins.delete('preload')
    config.plugins.delete('prefetch')
  }
}
然而这样做并不是很推荐,因为:
- 硬编码的文件名不利于实现高效率的缓存控制。
- 硬编码的文件名也无法很好的进行 code-splitting (代码分段),因为无法用变化的文件名生成额外的 JavaScript 文件。
- 硬编码的文件名无法在[现代模式]下工作。
你应该考虑换用 [indexPath] 选项将生成的 HTML 用作一个服务端框架的视图模板。
处理静态资源
静态资源可以通过两种方式进行处理:
- 在 JavaScript 被导入或在 template/CSS 中通过相对路径被引用。这类引用会被 webpack 处理。
- 放置在
public目录下或通过绝对路径被引用。这类资源将会直接被拷贝,而不会经过 webpack 的处理。
从相对路径导入
当你在 JavaScript、CSS 或 *.vue 文件中使用相对路径 (必须以 . 开头) 引用一个静态资源时,该资源将会被包含进入 webpack 的依赖图中。在其编译过程中,所有诸如 <img src="...">、background: url(...) 和 CSS @import 的资源 URL 都会被解析为一个模块依赖。
例如,url(./image.png) 会被翻译为 require('./image.png'),而:
<img src="./image.png">将会被编译到:
h('img', { attrs: { src: require('./image.png') }})在其内部,我们通过 file-loader 用版本哈希值和正确的公共基础路径来决定最终的文件路径,再用 url-loader 将小于 4kb 的资源内联,以减少 HTTP 请求的数量。
你可以通过 [chainWebpack]调整内联文件的大小限制。例如,下列代码会将其限制设置为 10kb:
// vue.config.js
module.exports = {
  chainWebpack: config => {
    config.module
      .rule('images')
        .use('url-loader')
          .loader('url-loader')
          .tap(options => Object.assign(options, { limit: 10240 }))
  }
}
URL 转换规则
- 如果 URL 是一个绝对路径 (例如
/images/foo.png),它将会被保留不变。 - 如果 URL 以
.开头,它会作为一个相对模块请求被解释且基于你的文件系统中的目录结构进行解析。 - 如果 URL 以
~开头,其后的任何内容都会作为一个模块请求被解析。这意味着你甚至可以引用 Node 模块中的资源:
<img src="~some-npm-package/foo.png">- 如果 URL 以
@开头,它也会作为一个模块请求被解析。它的用处在于 Vue CLI 默认会设置一个指向<projectRoot>/src的别名@。(仅作用于模版中)
Vue CLI 项目天生支持 [PostCSS]、[CSS Modules]和包含 [Sass]、[Less]、[Stylus] 在内的预处理器。
webpack 相关
// vue.config.js
module.exports = {
  configureWebpack: config => {
    if (process.env.NODE_ENV === 'production') {
      // 为生产环境修改配置...
    } else {
      // 为开发环境修改配置...
    }
  }
}模式是 Vue CLI 项目中一个重要的概念。默认情况下,一个 Vue CLI 项目有三个模式:
development模式用于vue-cli-service servetest模式用于vue-cli-service test:unitproduction模式用于vue-cli-service build和vue-cli-service test:e2e
Vue CLI 启动时已经存在的环境变量拥有最高优先级,并不会被 .env 文件覆写。
.env 环境文件是通过运行 vue-cli-service 命令载入的,因此环境文件发生变化,你需要重启服务。
vue-cli-service build会加载可能存在的.env、.env.production和.env.production.local文件然后构建出生产环境应用。vue-cli-service build --mode staging会在 staging 模式下加载可能存在的.env、.env.staging和.env.staging.local文件然后构建出生产环境应用。
你可以在 vue.config.js 文件中计算环境变量。它们仍然需要以 VUE_APP_ 前缀开头。这可以用于版本信息:
process.env.VUE_APP_VERSION = require('./package.json').version

module.exports = {
  // config
}
只在本地有效的变量
有的时候你可能有一些不应该提交到代码仓库中的变量,尤其是当你的项目托管在公共仓库时。这种情况下你应该使用一个 .env.local 文件取而代之。本地环境文件默认会被忽略,且出现在 .gitignore 中。
.local 也可以加在指定模式的环境文件上,比如 .env.development.local 将会在 development 模式下被载入,且被 git 忽略。
在本地预览生产环境构建最简单的方式就是使用一个 Node.js 静态文件服务器
npm install -g serve
# -s 参数的意思是将其架设在 Single-Page Application 模式下
# 这个模式会处理即将提到的路由问题
serve -s dist
部署 VuePress 到 GitHub Pages
初始化本地项目,将 VuePress 作为本地依赖安装:
# 初始化项目
cd ~/Desktop
mkdir my-vuepress
cd my-vuepress
npm init -y

# 将 VuePress 作为一个本地依赖安装
yarn add -D vuepress # 或者:npm install -D vuepress

# 新建一个 docs 文件夹
mkdir docs

# 新建一个 markdown 文件
echo '# Hello VuePress!' > docs/README.md
接着,在 package.json 里加一些脚本:
{
  "scripts": {
    "docs:dev": "vuepress dev docs",
    "docs:build": "vuepress build docs",
    "deploy-gh": "GH=1 yarn docs:build && bash scripts/deploy-gh.sh"
  }
}
运行本地开发环境:
yarn docs:dev # 或者:npm run docs:dev或构建线上静态文件:
yarn docs:build # 或者:npm run docs:build在 docs/.vuepress/config.js 中配置正确的 base。
module.exports = {
  title: "My Blog",
  description: "This is a blog.",
  base: '/blog/'
}
新建脚本 my-vuepress/scripts/deploy-gh.sh
#!/usr/bin/env sh

# 确保脚本抛出遇到的错误
set -e

# 生成静态文件
npm run docs:build

# 进入生成的文件夹
cd docs/.vuepress/dist

# 如果是发布到自定义域名
# echo 'www.example.com' > CNAME

git init
git add -A
git commit -m 'deploy'

# 如果发布到 https://<USERNAME>.github.io
# git push -f git@github.com:<USERNAME>/<USERNAME>.github.io.git master

# 如果发布到 https://<USERNAME>.github.io/<REPO>
# git push -f git@github.com:<USERNAME>/<REPO>.git master:gh-pages

# 把上面的 <USERNAME> 换成你自己的 Github 用户名,<REPO> 换成仓库名,比如我这里就是:
git push -f git@github.com:wtyqer/blog.git master:gh-pages

cd -
执行脚本进行部署:
yarn deploy-gh # 或者:npm run deploy-gh安装node.js
官网:https://nodejs.org/en/download/
历史版本:https://nodejs.org/en/download/releases/
安装node,建议不要安装在系统盘(如C:)
在nodejs安装路径下,新建node_global和node_cache两个文件夹
设置nodejs prefix(全局)和cache(缓存)路径
$ npm config get registry
https://registry.npm.taobao.org/

$ cnpm config get registry
https://registry.nlark.com/

$ yarn config get registry
https://registry.npm.taobao.org
基于 Node.js 安装cnpm(淘宝镜像)
npm install -g cnpm --registry=https://registry.npm.taobao.org修改系统变量PATH

新增系统变量NODE_PATH
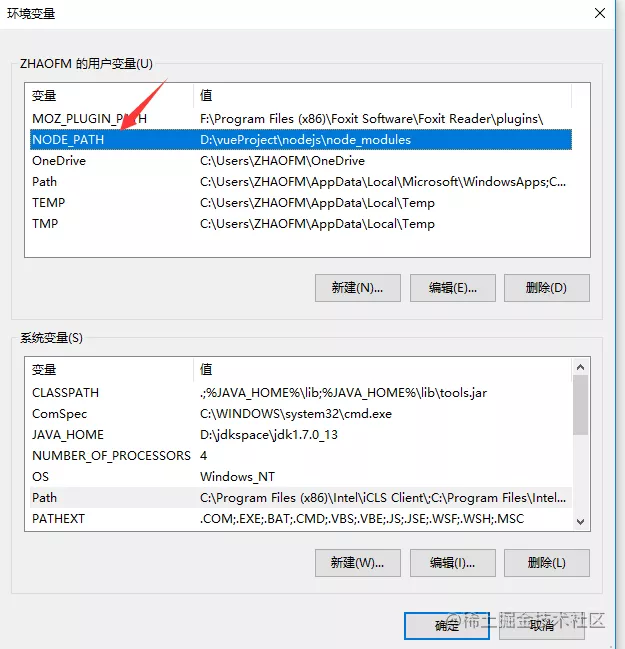
baseUrl
从 Vue CLI 3.3 起已弃用,请使用[publicPath]
publicPath
- Type:
string - Default:
'/'部署应用包时的基本 URL。
outputDir
- Type:
string - Default:
'dist'当运行vue-cli-service build时生成的生产环境构建文件的目录。注意目标目录在构建之前会被清除 (构建时传入--no-clean可关闭该行为)。
assetsDir
- Type:
string - Default:
''放置生成的静态资源 (js、css、img、fonts) 的 (相对于outputDir的) 目录。
indexPath
- Type:
string - Default:
'index.html'指定生成的index.html的输出路径 (相对于outputDir)。也可以是一个绝对路径。
pages
module.exports = {
  pages: {
    index: {
      // page 的入口
      entry: 'src/index/main.js',
      // 模板来源
      template: 'public/index.html',
      // 在 dist/index.html 的输出
      filename: 'index.html',
      // 当使用 title 选项时,
      // template 中的 title 标签需要是 <title><%= htmlWebpackPlugin.options.title %></title>
      title: 'Index Page',
      // 在这个页面中包含的块,默认情况下会包含
      // 提取出来的通用 chunk 和 vendor chunk。
      chunks: ['chunk-vendors', 'chunk-common', 'index']
    },
    // 当使用只有入口的字符串格式时,
    // 模板会被推导为 `public/subpage.html`
    // 并且如果找不到的话,就回退到 `public/index.html`。
    // 输出文件名会被推导为 `subpage.html`。
    subpage: 'src/subpage/main.js'
  }
}
lintOnSave
- Type:
boolean|'warning'|'default'|'error' - Default:
'default'
设置让浏览器 overlay 同时显示警告和错误:
// vue.config.js
module.exports = {
  devServer: {
    overlay: {
      warnings: true,
      errors: true
    }
  }
}
当 lintOnSave 是一个 truthy 的值时,eslint-loader 在开发和生产构建下都会被启用。如果你想要在生产构建时禁用 eslint-loader,你可以用如下配置:
// vue.config.js
module.exports = {
  lintOnSave: process.env.NODE_ENV !== 'production'
}
transpileDependencies
- Type:
Array<string | RegExp> - Default:
[]默认情况下babel-loader会忽略所有node_modules中的文件。如果你想要通过 Babel 显式转译一个依赖,可以在这个选项中列出来。
productionSourceMap
- Type:
boolean - Default:
true如果你不需要生产环境的 source map,可以将其设置为false以加速生产环境构建。
configureWebpack
- Type:
Object | Function如果这个值是一个对象,则会通过 [webpack-merge]合并到最终的配置中。如果这个值是一个函数,则会接收被解析的配置作为参数。该函数既可以修改配置并不返回任何东西,也可以返回一个被克隆或合并过的配置版本。
chainWebpack
- Type:
Function是一个函数,会接收一个基于 webpack-chain 的ChainableConfig实例。允许对内部的 webpack 配置进行更细粒度的修改。
devServer.proxy 可以是一个指向开发环境 API 服务器的字符串:
module.exports = {
  devServer: {
    proxy: 'http://localhost:4000'
  }
}
module.exports = {
devServer: {
proxy: {
'/api': {
target: '<url>',
ws: true,
changeOrigin: true
},
'/foo': {
target: '<other_url>'
}
}
}
}在普通webpack 中的配置, 可以同时使用 多个预处理器。
module.exports = {
    // ...
    module: {
        rules: [{
            test: /.less$/,
            use: ['style-loader', 'less-loader', 'less-loader', {
                loader: 'style-resources-loader',
                options: {
                    patterns: [ // 只有一条时也可以写成对象形式
                        path.resolve(__dirname, 'path/to/scss/variables/*.less'),
                        path.resolve(__dirname, 'path/to/scss/mixins/*.less'),
                    ],
                    injector: 'append' // 如果在样式文件之后导入就加此行配置
                }
            }]
        }]
    },
    // ...
}
pluginOptions
- Type:
Object这是一个不进行任何 schema 验证的对象,因此它可以用来传递任何第三方插件选项。例如:module.exports = {
pluginOptions: {
foo: {
// 插件可以作为 `options.pluginOptions.foo` 访问这些选项。
}
}
}
style样式资源处理器,在style资源中注入内容,导入css / sass / scss / less / stylus这些内容
主要作用
导入一些公共的样式文件,比如:variables / mixins / functions,避免在每个样式文件中手动的@import导入
浏览器的同源策略
就是两个页面具有相同的 协议protocol , 主机host , 端口号port
请求一个接口时,出现 Access-Control-Allow-Origin 等 就是说明请求跨域了
vue中解决跨域:配置vue.config.js文件,如果没有就自己建一个
原理:
- 将域名发送给本地的服务器localhost:8080
- 再由本地的服务器去请求真正的服务器
- 因为请求是从服务端发出的,所以就不存在跨域的问题了
修改vue.config.js文件 需要重启服务
module.exports = {
 devServer: {
  // 跨域
  proxy: {
   '/api': {
    // 目标路径
    target: 'https://www.bilibili.com/',
    // 允许跨域
    changeOrigin: true,
    // 重写路径
    pathRewrite: {
     '^/api': ''
    }
   }
  }
 }
}
前端工程化、模块化、组件化、自动化、规范化
所谓前端工程化,我认为就是将前端项目当成一项系统工程进行分析、组织和构建从而达到项目结构清晰、分工明确、团队配合默契、开发效率提高的目的。
模板化是在文件层面上,对代码和资源的拆分。就是将一个大文件拆分成相互依赖的小文件,再进行统一的拼装和加载。
“简单重复的工作交给机器来做”,自动化也就是有很多自动化工具(glup、webpack)代替我们来完成,例如持续集成、自动化构建、自动化部署、自动化测试等等。
目录结构的制定、编码规范、前后端接口规范、文档规范、组件管理、代码包管理(SVN、Git)、commit提交代码备注描述规范、定期codeReview、视觉图标规范
如果您在声明组件时更喜欢基于类的 API,则可以使用官方维护的 [vue-class-component]装饰器:
import Vue from 'vue'
import Component from 'vue-class-component'

// @Component 修饰符注明了此类为一个 Vue 组件
@Component({
  // 所有的组件选项都可以放在这里
  template: '<button @click="onClick">Click!</button>'
})
export default class MyComponent extends Vue {
  // 初始数据可以直接声明为实例的 property
  message: string = 'Hello!'

  // 组件方法也可以直接声明为实例的方法
  onClick (): void {
    window.alert(this.message)
  }
}
[增强类型以配合插件使用]
TypeScript 有一个特性来补充现有的类型,叫做[模块补充]
声明一个 string 类型的实例 property $myProperty:
// 1. 确保在声明补充的类型之前导入 'vue'
import Vue from 'vue'

// 2. 定制一个文件,设置你想要补充的类型
//    在 types/vue.d.ts 里 Vue 有构造函数类型
declare module 'vue/types/vue' {
// 3. 声明为 Vue 补充的东西
  interface Vue {
    $myProperty: string
  }
}
在你的项目中包含了上述作为声明文件的代码之后 (像 my-property.d.ts),你就可以在 Vue 实例上使用 $myProperty 了。
var vm = new Vue()
console.log(vm.$myProperty) // 将会顺利编译通过
你也可以声明额外的 property 和组件选项:
import Vue from 'vue'

declare module 'vue/types/vue' {
  // 可以使用 `VueConstructor` 接口
  // 来声明全局 property
  interface VueConstructor {
    $myGlobal: string
  }
}

// ComponentOptions 声明于 types/options.d.ts 之中
declare module 'vue/types/options' {
  interface ComponentOptions<V extends Vue> {
    myOption?: string
  }
}
上述的声明允许下面的代码顺利编译通过:
// 全局 property
console.log(Vue.$myGlobal)

// 额外的组件选项
var vm = new Vue({
  myOption: 'Hello'
})
[标注返回值]
因为 Vue 的声明文件天生就具有循环性,TypeScript 可能在推断某个方法的类型的时候存在困难。因此,你可能需要在 render 或 computed 里的方法上标注返回值。
import Vue, { VNode } from 'vue'

const Component = Vue.extend({
  data () {
    return {
      msg: 'Hello'
    }
  },
  methods: {
    // 需要标注有 `this` 参与运算的返回值类型
    greet (): string {
      return this.msg + ' world'
    }
  },
  computed: {
    // 需要标注
    greeting(): string {
      return this.greet() + '!'
    }
  },
  // `createElement` 是可推导的,但是 `render` 需要返回值类型
  render (createElement): VNode {
    return createElement('div', this.greeting)
  }
})
如果你发现类型推导或成员补齐不工作了,标注某个方法也许可以帮助你解决这个问题。使用 --noImplicitAny 选项将会帮助你找到这些未标注的方法。
[标注 Prop]
import Vue, { PropType } from 'vue'

interface ComplexMessage {
  title: string,
  okMessage: string,
  cancelMessage: string
}
const Component = Vue.extend({
  props: {
    name: String,
    success: { type: String },
    callback: {
      type: Function as PropType<() => void>
    },
    message: {
      type: Object as PropType<ComplexMessage>,
      required: true,
      validator (message: ComplexMessage) {
        return !!message.title;
      }
    }
  }
})
Jest
Jest 是一个专注于简易性的 JavaScript 测试框架。一个其独特的功能是可以为测试生成快照 (snapshot),以提供另一种验证应用单元的方法。
Mocha
Mocha 是一个专注于灵活性的 JavaScript 测试框架。因为其灵活性,它允许你选择不同的库来满足诸如侦听 (如 Sinon) 和断言 (如 Chai) 等其它常见的功能。另一个 Mocha 独特的功能是它不止可以在 Node.js 里运行测试,还可以在浏览器里运行测试。
Vue Testing Library (@testing-library/vue)
Vue Testing Library 是一组专注于测试组件而不依赖实现细节的工具。由于在设计时就充分考虑了可访问性,它采用的方案也使重构变得轻而易举。
它的指导原则是,与软件使用方式相似的测试越多,它们提供的可信度就越高。
Vue Test Utils
Vue Test Utils 是官方的偏底层的组件测试库,它是为用户提供对 Vue 特定 API 的访问而编写的。如果你对测试 Vue 应用不熟悉,建议你使用 Vue Testing Library,它是 Vue Test Utils 的抽象。
[端到端 (E2E) 测试]
端到端测试验证应用中的所有层。这不仅包括你的前端代码,还包括所有相关的后端服务和基础设施,它们更能代表你的用户所处的环境。通过测试用户操作如何影响应用,端到端测试通常是提高应用是否正常运行的信心的关键。
Vue.js 生态系统中常用的端到端测试框架
Cypress.io
Cypress.io 是一个测试框架,旨在通过使开发者能够可靠地测试他们的应用,同时提供一流的开发者体验,来提高开发者的生产率。
Nightwatch.js
Nightwatch.js 是一个端到端测试框架,可用于测试 web 应用和网站,以及 Node.js 单元测试和集成测试。
Puppeteer
Puppeteer 是一个 Node.js 库,它提供高阶 API 来控制浏览器,并可以与其他测试运行程序 (例如 Jest) 配对来测试应用。
TestCafe
TestCafe 是一个基于端到端的 Node.js 框架,旨在提供简单的设置,以便开发者能够专注于创建易于编写和可靠的测试。
添加实例 property
你可能会在很多组件里用到数据/实用工具,但是不想[污染全局作用域]。这种情况下,你可以通过在原型上定义它们使其在每个 Vue 的实例中可用。
Vue.prototype.$appName = 'My App'这样 $appName 就在所有的 Vue 实例中可用了,甚至在实例被创建之前就可以。如果我们运行:
new Vue({
  beforeCreate: function () {
    console.log(this.$appName)
  }
})
则控制台会打印出 My App。就这么简单!
[当没有使用模块系统时]
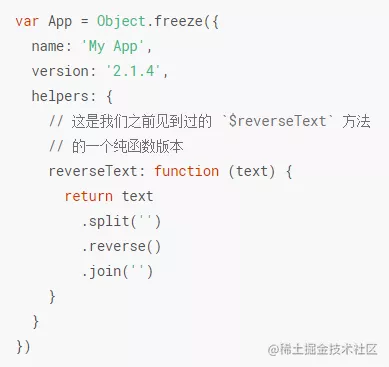
Object.freeze,它做的事情是阻止这个对象在未来被修改。
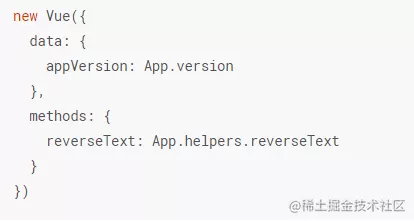
SVG 图标系统
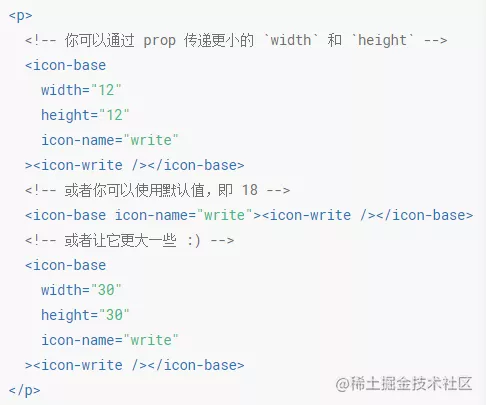
[在浏览器中展示源代码]
vue.config.js 内的 devtool property:
module.exports = {
  configureWebpack: {
    devtool: 'source-map'
  }
}
[Vue Devtools]
能够为 Vuex 提供时间旅行式的调试体验。
内存泄漏在 Vue 应用中通常不是来自 Vue 自身的,更多地发生于把其它库集成到应用中的时候。
keep-alive 包裹一个组件后,它的状态就会保留,因此就留在了内存里。
当你用 keep-alive 包裹一个组件后,它的状态就会保留,因此就留在了内存里。
<button @click="show = false">Hide</button>
<keep-alive>
  <!-- `<my-component>` 即便被删除仍会刻意保留在内存里 -->
  <my-component v-if="show"></my-component>
</keep-alive>
这个技巧可以用来提升用户体验。
activated 和 deactivated
deactivated: function () { // 移除任何你不想保留的数据 }客户端存储
localStorage.name = this.name;永远不要把
v-if和v-for同时用在同一个元素上。
一般我们在两种常见的情况下会倾向于这样做:
- 为了过滤一个列表中的项目 (比如
v-for="user in users" v-if="user.isActive")。在这种情形下,请将users替换为一个计算属性 (比如activeUsers),让其返回过滤后的列表。 - 为了避免渲染本应该被隐藏的列表 (比如
v-for="user in users" v-if="shouldShowUsers")。这种情形下,请将v-if移动至容器元素上 (比如ul、ol)。
组件的
data必须是一个函数。
当在组件中使用 data property 的时候 (除了 new Vue 外的任何地方),它的值必须是返回一个对象的函数。
当
data的值是一个对象时,它会在这个组件的所有实例之间共享。
Prop 定义应该尽量详细。
在你提交的代码中,prop 的定义应该尽量详细,至少需要指定其类型。
有两个好处:
- 它们写明了组件的 API,所以很容易看懂组件的用法;
- 在开发环境下,如果向一个组件提供格式不正确的 prop,Vue 将会告警,以帮助你捕获潜在的错误来源。
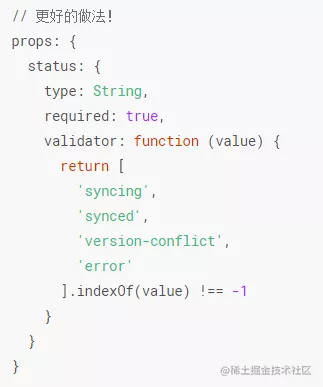
总是用
key配合v-for。
[为组件样式设置作用域]scoped
只应该拥有单个活跃实例的组件应该以 The 前缀命名,以示其唯一性。
components/
|- TodoList.vue
|- TodoListItem.vue
|- TodoListItemButton.vue
components/
|- SearchSidebar.vue
|- SearchSidebarNavigation.vue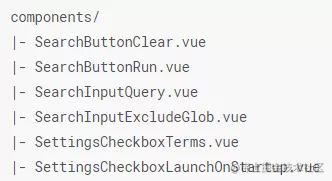
<!-- 在单文件组件、字符串模板和 JSX 中 -->
<MyComponent/>
<!-- 在 DOM 模板中 -->
<my-component></my-component><!-- 在单文件组件和字符串模板中 -->
<MyComponent/><!-- 在 DOM 模板中 -->
<my-component></my-component>或者
<!-- 在所有地方 -->
<my-component></my-component>
Vue.component('MyComponent', {
// ...
})Vue.component('my-component', {
// ...
})import MyComponent from './MyComponent.vue'export default {
name: 'MyComponent',
// ...
}props: {
greetingText: String
}<WelcomeMessage greeting-text="hi"/><img
src="https://vuejs.org/images/logo.png"
alt="Vue Logo"
><MyComponent
foo="a"
bar="b"
baz="c"
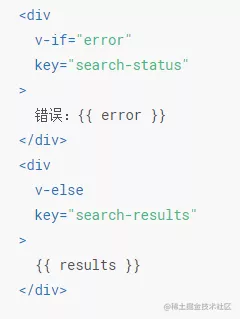
/>
元素选择器应该避免在
scoped中出现。
在 scoped 样式中,类选择器比元素选择器更好,因为大量使用元素选择器是很慢的。

 UI树欲静
UI树欲静


